 |
| Measuring Up Before Laying the Foundation |
I planned the pedestal based on brick dimensions - 4 across the back, and 4 1/2 for each side. I was uncertain of the number of layers of bricks that I could do, but knew it was 7 or 8. This would get the oven at or above waist height.
My father-in-law Bob and I got started on the pedestal on a Saturday morning. When Bob arrived I was just preparing, and considering a slight change of plans. I figured the U-shape would look even better if the ends curved in by half-a-brick. This did not alter the number of bricks needed, and they would take up less space, so nothing else had to be changed.
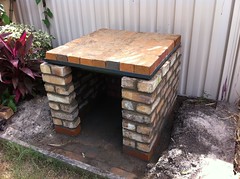 |
| The Completed Pedestal |
I had made a template (cut a piece of timber to length) to get the dimensions right to fit the shower base, and when we were finished building, it just popped in. Given the weight of the shower base, I should probably have left it out for 24 hours, but instead I put sand in it, and laid the brick foundation for the oven. Job done.
...Geoff the Brickie
No comments:
Post a Comment