 |
| Template for Dimensions |
 |
| Starting the Dome |
 |
| Measuring the Dome |
Then it was time to mix the clay with the sand. I followed Simon Brookes's instructions pretty closely. We put a thick but old tarp doubled over onto a concreted area. We threw down a few shovels of sand, and we broke the clay into thumb-sized pieces. We broke up clay and did the twist for ever. Then we did it some more. This is apparently called 'puddling', and it is a nightmare of a job. We may have had an overly dry mix, but that clay was determined to stay in blobs rather than mix with the sand. Eventually we had a mix we liked. It had taken about an hour of continuous dancing.
 |
| The Materials, Pre-Puddling |
I used the drop test on both batches, and both busted up a bit, with the second batch holding together better than the first.
If anyone is interested, I used 2-day old clay (I dug it up 2 days before, and just dropped it in a heap on the ground), and I estimate this layer involved the following quantities:
 |
| Puddling (Doing 'The Twist') |
First batch:
2 x full 18-litre bucket of lumpy clay
4 x 3/4 full 18-litre bucket of sand
Second batch:
2 x full 18-litre bucket of lumpy clay
4 x 3/4 full 18-litre bucket of sand
We added water by guess (probably between 9 and 18 litres in all for each batch), mainly keeping the mixture damp rather than wet. (Based on the theory that we can add more water but we cannot take it away.) I think our approach resulted in a too sandy and too dry mix, especially based on what we worked with for the next two layers.
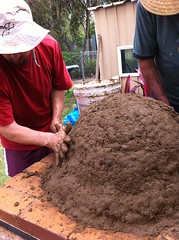
We applied this layer by making small, very rough bricks and karate chopping the back edges going around in circles. We had a fair bit of clay left, so we added some of this by slapping it on in handfuls. This was not so much an entire layer as a thick coating on and between the rough bricks. In adding this rough layer it became apparent that a lot of our thumb sized lumps of clay were still thumb-sized lumps of clay. (We had not mixed them in very well.)
...Geoff the Dancer (speciality: the twist)


is your base fire bricks or regular bricks?
ReplyDeleteHi Roger,
ReplyDeleteI used regular bricks as (a) they were available for free, and (b) I couldn't find a solid argument for firebricks on the internet. In hindsight I suspect that these do not hold heat as well as they could, but give my cooking method (pizza tray on coals) that has not been a problem.