Showing posts with label clay oven. Show all posts

Saturday, May 21, 2016

16. Update - Five Years On

Not a Happy Oven
Wow.

It turns out that the crack (see earlier posts) is not the biggest problem I could have had. We had a tropical cyclone rated at category 4. I was not home when the cyclone hit, and my usual technique of protecting the oven with a bit of plastic held down by a big roll of fencing wire failed. You might say that was predictable, but in 18 years not a single cyclone has directly hit my city, and the damage the oven suffered is nothing in comparison with many people's houses and yards.

Exposure to a category 4 cyclone is a problem for clay pizza ovens. It is repairable, but I have to decide whether to repair or whether this is a message that it is time for 'Mark II'. I wont go into details yet, but I have some ideas for improving on my first oven.

A little dejected,

...Geoff (not currently using the oven)

Saturday, October 18, 2014

15. Update - Three Years On

The Crack - Ever Growing
Well, it's been a long while since I last posted. It seems a good time to give an update.

First, the crack is getting worse, as you can see here. The smoke you can see in the photo is coming out of the mouth of the oven, but last time it was used I saw a vague outline of smoke venting from the main section of the upper-most crack. (Mark II is always coming closer!)


The Wood Box - Full at the Moment

Second, I don't know if I've shown this angle before, so thought I'd include a photo showing the wood box below the oven.  Next time I run out of wood I'd like to make some sort of cradle to keep the wood off the ground (as the bricks are doing), but also to let our terriers in, in case of rats.
Pizza Cooking in the Clay Pizza Oven


Thirdly, here are some shots of the oven in use. You can clearly see my technique of creating a small bed of hot coals to cook on.
Another Pizza Cooking

Sorry I cannot give you a taste, or even a chance to smell them. You'll just have to use your imagination.
Chocolate Self-saucing Pudding in the Clay Pizza Oven


Fourthly, and finally, dessert is cooked straight on the floor after all the pizzas are finished. Usually 10-14 pizzas have been cooked over about an hour by this time.

I don't know how hot the oven is, but the chocolate self-saucing pudding takes about 10 minutes to cook. (The recipe we use says something like 40-60 minutes in a moderate oven.)
Yummy

As you would know, the proof of the pudding is in the eating. And the eating is good.

...Geoff the Chef

Thursday, June 12, 2014

14. Simple Pizza Base Recipe

Since posting my original recipe back in 2012 there has been an ongoing process of extensive testing involving seeing 'what I can get away with' in eliminating complexity and effort.  (Laziness and distraction are hard taskmasters.)  I am down to commencing this process about 90 minutes before pizza cooking time.

So here is the 'stripped down' version of my former recipe (a lot less recognisable as originating as the Forno Bravo 'Authentic Vera Pizza Napoletana Dough Recipe'):

Ingredients

1kg box                 Lighthouse Bread & Pizza Plain Flour 
650ml                   Warm water (65% hydration)
1/2 tablespoon (15gm)   Salt
1 tablespoon (6gm)      Active Dry Yeast
1 splash                Olive Oil
couple handfulls        Plain Flour

Equipment

Mixer with dough hook
Pizza Trays (8")
Rolling Pin
Dough Roller Docker (confused? click here)
Lightly floured flat surface

Method
  1. Put dry ingredients in bowl of the mixer.
  2. Mix well.
  3. Turn the mixer to low and add the water gradually - you need all of it.
  4. Run the mixer on medium for maybe 5 minutes, then on slow for a minute or two.
  5. Make a big ball of the dough, splash on some olive oil, rubbing it around to coat the whole ball.
  6. Put the ball back in the mixing bowl, cover with Gladwrap (Saran wrap?) and put it in a warm place until doubled.
  7. Wait 1-2 hours.  (If it gets really big, push the air out with your fist.)
  8. When you are ready to cook, lightly flour a flat surface.
  9. Tear off a 3/4 fist-sized chunk (for 8" pizzas).
    (You may need to experiment to find your preferred size.)
  10. Make it into a ball.  (If you are fussy, choose a smooth part of the ball, and stretch it downwards by rubbing the palms downwards, then pinch the remains together at the bottom.)
  11. Roll the ball out on the floured surface using the rolling pin. Thin is good
  12. Put the rolled-out dough on a pizza tray and roll with the dough roller docker to perforate the surface.
  13. Add toppings, then cook.
By the way, stuff all the 'this topping, that topping' stuff.  Just raid the fridge and remember, 'everything savoury tastes better on pizza'.

...Geoff the Lazy Chef

Saturday, August 13, 2011

12. Loving the Pizza Oven (Cracks and All)


Mmmm...
I thought I'd post an update on the clay pizza oven.  As usual, the proof is in the eating, and the eating is great!

I mentioned experimenting with various cooking methods in the previous post.  The pizza-on-pizza-tray-on-a-bed-of-coals method has been very successful.  If there are a lot of coals, banking them around the outside results in the top burning before the base is cooked, so I have started to put most coals under the pizza tray, with less pushed into the corners.  This is working well so far.

The Steel Peel in Action
It would seem to be obvious that a timber pizza peel (or shovel) would burn when in frequent contact with hot coals, but I didn't predict it.  My parents were on-hand when this happened, and bought a 'pizza oven warming gift' of a steel peel which has been excellent.  It is from Barbeques Galore in Australia.  (Link to the product.)  The handle may not be long enough for igloo-shaped doors, but is perfect for my oven.

Although I did a patch up with leftover clay, the crack has returned.  It does not take much imagination to see the crack (which starts on one side of the door, goes around the back of the oven, and terminates on the other side of the door) as being like a boiled egg that has been cracked prior to taking off the top.  I am learning to live with it.  No extra heat or smoke escapes through the narrow gap, which is the priority.  As the oven is Mark I it also seems to be OK to have some rustic charm.

...Geoff the pizza chef

Sunday, May 29, 2011

11. First Pizza & Great Satisfaction

Homemade Pizza Peel
My wife noticed that I had gone quiet about the clay pizza oven; it having been my obsession for the last few months.  She decided that we would cook pizzas the next day, and we did.

(My enthusiasm had waned due to mixed performance with bread and large cracks.)

I started the day with another trip to the Dump Shop for materials.  This time to make a pizza peel (or shovel).  I found a perfect piece of laminated timber, cut it to shape, and added a eucalyptus stick for a rustic handle.  I used a hand sander to thin out the front edge into a blunt blade.  The peel performed well, but needs some more work to thin out the 'blade'.

Patching the Crack
I planned to start cooking at 5pm.  I set a medium-sized fire at about 3pm, lit it at 3:30, added sticks and hardwood logs no bigger than my wrists, and worked up to a full base of coals about an inch thick by 5:30.  At that time I stopped adding timber, and waited half-an-hour for the contents to burn down to coals.

While the oven was heating I patched up the cracks using some clay and sand (probably 50:50) that I had left handy in a bucket.  At full heat the clay dried and blended in.  It is now as if there had never been a huge gaping crack.  (I know, I exaggerate.)

At 5:30 I made the pizza dough, using the recipe in an early edition of Simply No Knead Breadmaking by Carol and Ken Bates - a practical, classic Australian home bakers' 'how to'.  This dough is only slightly moist and very easy to handle.

The Very First Pizza - Garlic
Starting at about 6pm, I cooked 8- to 9-inch diameter pizzas using a number of methods, including:

  1. Garlic pizzas on 9-inch aluminium pizza trays on the floor.
  2. Pizzas with few toppings on 9-inch aluminium pizza trays.
  3. Pizzas with few toppings on 9-inch aluminium pizza trays on a bed of hot coals.
  4. Pizzas with lots of toppings on 9-inch aluminium pizza trays on hot coals.
  5. Garlic pizza directly on the brick floor.
  6. Pizza with lots of toppings directly on the brick floor.

One With The Lot
All of the pizzas were great to eat.  The tops cooked well, and rapidly using all methods.  However, when the pizza trays were on the floor of the oven (at around 400 degrees celsius) the bases were pale and did not cook well relative to the speed at which the tops and edges cooked.  The bases cooked best on trays on a bed of coals, and also when cooked directly on the brick floor.  Cooking directly on the floor was fine with garlic only, but a messy job when toppings were added.  The winner is cooking on pizza trays on a bed of coals.  I am sure I will continue to experiment.

...Geoff the L-plater oven chef
Cooking on the Bricks

Saturday, May 21, 2011

10. Firing The Oven

Firing the Oven
Apparently it is important to dry out the clay thoroughly at low temperatures gradually increasing to pizza-cooking temperatures.  Thanks to 'david s' at the Forno Bravo forums, I now know why the top layer of clay formed cracks.  Scary cracks.  I once had a crack on my windscreen that started small.  Eventually the windscreen needed to be replaced.  And the cracks in the windscreen were nothing on the cracks in the oven.

The Crack, Not Big Enough for a Matchstick
I sort of went through a process of firing the oven - after the first fire, I set fires a few more times.  And the crack continued to grow.

Crack a Week Later, With Matchstick
For Mark II, apparently firing (also known as 'curing') the oven properly involves paper fires, then briquette (heat bead) fires, then stick fires, then log fires.  David s suggested 20 kilograms of briquettes.  This might be 10 times the 10 or so hours I had in fires.  Also, my enthusiasm for fire overtook caution, so my fires started pretty big.  Firing can be accompanied by weeks of air drying.  It did take about 3 weeks to work up to pizzas, but mostly due to a temporary loss of confidence (in proportion with the growth of the crack).

Spuds in Foil Among the Coals
Another alternative may be to dry each layer in turn.  I wondered why Simon Brookes emptied out sand and fired the first layer.  I did not have confidence that the first layer would stand up.  Hence the need to add more layers before emptying the sand.

Spuds Ready For Eating
Along the way I tried to cook a couple of french sticks, which failed due to insufficient heat.  I rescued them in sufficient time to put them in the inside oven and cook them successfully, but this was a failure for the oven.  Later that day, after a lot more briquettes, I roasted whole potatoes in foil to great success.

...Geoff (still) the pyro
Shiny 9-inch Pizza Trays

At about this time I also took delivery of a dozen shiny 9-inch aluminium pizza trays.

Friday, May 6, 2011

9. Remove Sand & Initial Fire

Ready to Fire
Another major milestone was removing the sand and lighting the first fire.

The sand came out easily. It was a bit damp, or maybe just felt pretty cold. Inside the newspaper lining was not completely dry, but not wet either - it was cold to the touch, like the sand. Some of the newspaper came away, but most of it stuck to the clay, so I left it for the flames to address.
Sand Removed

I built a small fire just inside the doorway. When attempted further in, it did not want to stay lit. It is certainly difficult to keep a small fire alight.

The fire burnt for about 2 1/2 hours. The top and sides became warm to the touch, and too warm to touch just above the doorway. The back was only just warm. Due to the thickness there I put bricks in the doorway when I stopped feeding the fire, to reflect the head from the coals back to the back wall. About 20 minutes later the back wall was quite warm.
Fire Underway

I am not sure whether the clay needs to be left any longer, but I am leaving it a week out of caution, and while I wait for delivery of my 9-inch pizza trays (ordered on eBay).

...Geoff the Pyro

Bricks to Reflect Heat to Back Wall

Tuesday, May 3, 2011

8. Mix & Lay 3rd Layer

Mixing Thumb-sized Chunks of Clay
After the second batch we were pretty enthusiastic about doing the final batch.  I think we got a bit cocky, and as a result we went with a much too liquid-y mix for this layer - but more of that later.

We again used the power drill and paint stirrer.  We started with the 40-50 litre bucket, but broke it part-way through and swapped to a 20 litre bucket.  The quantities below are for a 40-50 litre bucket unless specified otherwise.

The rough quantities for this batch were:

First Batch: (good)
1/3 bucket of lumpy freshly dug clay
1/3 full of water
Mixing in the Barrow
(Used the same approach as the previous batch - just mixing for a long time using the drill and paint stirrer.)

Second Batch: (fail)
1/4 bucket of broken up clay
1/2 full of water
(This one was probably a fail.  I broke up the clay first, then mixed for a shorter time using drill and paint stirrer.  There was a lot of clay left in the bottom of the bucket when I poured it into the barrow - this was probably mostly water.  We blame this batch for making this layer too wet.) 

More Mixing in the Barrow
Third Batch: (excellent)
1/2 bucket of water
Lots of clay broken up and dropped in a piece at a time - probably more than half a 40-50 litre bucket of lumpy clay
(After the second batch it was obvious we needed to get this right as the barrow had very wet contents and only limited clay.  Bob broke clay into thumb-sized pieces, as we did when we were puddling, and I continuously stirred with the drill and paint stirrer.  I tested the clay content by inventing 'the glove method' by dipping my hand in and removing it and seeing how much clay coated it.  With this batch the clay was one to two millimetres thick on my hand and very viscous.)

This were put in the barrow with ultimately about half a barrow of sand - this was added gradually to thicken the mix.

Pizza Oven Bandaged Up
This mix failed the drop test.  The result smushed and broke apart on impact.  By now we were over this part of the project, and we pressed on with the overly-wet mix.  If you have built a castle at the beach in the zone where waves are regularly inundating the base of your castle you will be familiar with the saturated sand you put onto the castle.  It resists shaping and tends to slide down the edges of the castle.  This is what we worked with. (Although I might have exaggerated a little.)

Like the wet sand at the beach, our mix wanted to 'slump' down on the steep sides of the oven, but sat well on the top. Bob came up with a solution to the slumping - adding a cardboard 'bandage' around the entire girth of the oven.  This did a good job of holding the clay up while it dried.

...Geoff the Sand Castle Builder

Sunday, May 1, 2011

7. Mix & Lay 2nd Layer

Materials Used to Mix  2nd & 3rd Layers
I had asked Bob to bring a steel paint mixer that he already owned on the day we worked on the first layer.  I was pretty committed to the puddling method at that time, so put it aside.  Having done my time twisting for that previous layer, I was ready to see whether our workflow could be improved. So we ran an experiment...

First Stage of Mixing Underway
Bob had brought the steel mixer and a powerful hand-held electric drill (Makita 6300-4).  I used these on about a third of a deep bucket of clay and water.  It was fantastic.  Not only did it mix, but it involved minimal effort.  It took some time, but not nearly as long as the puddling method, and without the dancing.

I added some more clay and water, and once I had about 3/4s of a bucket I poured (yes, poured) it over some sand in the wheel barrow.  The sand mixed in with the clay-ey liquid like mixing mortar.  I did some more and invited Bob around to assist in finishing the batch and putting it on as the second layer.
First Stage of Mixing Almost Complete

I used a 40 or 50 litre bucket.  The rough quantities for this layer were:

First Batch:

1/2 bucket of lumpy freshly dug clay
1/4 full of water
about 2 spades of sand (in the barrow)

Second Batch:
full bucket of lumpy clay
2/3 full of water
Second Stage of Mixing
about 4 spades of sand (in the barrow)

Mixing in the barrow, the first batch was probably a little too dry; and the second batch may have been a little too wet.

Overall, this layer was a bit wetter than the previous one.  It would have been difficult to form bricks.  Instead we applied this layer by making snowballs and going around in circles.  It was strong enough to allow me to add some extra clay mix as a slight cowling over the doorway.

Adding the Second Layer
...Geoff the Technology User

Second Layer Complete

Saturday, April 30, 2011

6. Source Clay (Second Site)

The Second Clay Mining Site
Although I had enough clay from my first dig, I was lucky enough to find some more, better clay in another spot. (I was lucky in an 'every cloud has a silver lining' kind of way.)

I unexpectedly had to dig a 60cm deep ditch for some electrical cable, and I found some excellent clay.  This was at the front of my property, not in a place I would speculatively dig.  However, as I was digging there anyway, I liberated enough clay to do the next two layers.

This clay was moist (which the other clay had not been), and paler than the original clay.  It was also stickier than the original clay.  It came from deeper than the original clay, and was in a mass, not in veins between layers of soil.  It came out in big clumps attached to the mattock.

I filled an old-style rubbish bin 1 1/2 times with clay.  I used this clay exclusively in the next two laters.

Clay from the Second Site (larger so you can see the texture)
...Geoff the Digger (again)

Saturday, April 16, 2011

5. Cut the Doorway

Cut for Doorway
A New Doorway
About 5 hours after finishing the first layer, I cut out the door.  Simon Brookes removed the sand and lit his first fire at this point, but I was not that confident, so I left the sand in there.  It stayed there until about five days after the final layer was laid.

I cut the clay with a retractable craft cutter, with the blade fully extended.  This worked well for me, although I can see that a perfectionist may want to achieve a neater finish.  The clay was still quite soft, and I played around with it to get a finish I was satisfied with.

...Geoff the Cutter

4. Prepare Dome & Mix & Lay 1st Layer

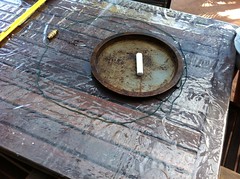
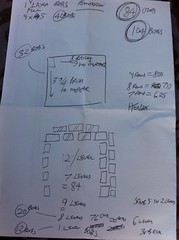
Template for Dimensions
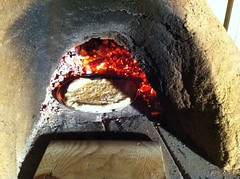
I was excited about the next phase of the job - starting the oven.  I re-read the relevant sections in Simon Brookes's PDF file in preparation.  My father-in-law Bob worked with me on this job too.
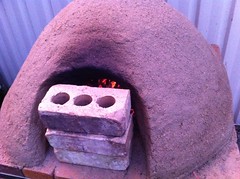
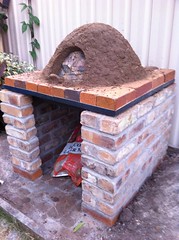
Starting the Dome
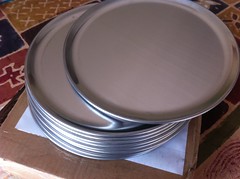
We were restricted in size by the size of the shower tray and brick foundation.  I started marked out the available external dimensions (92cm deep x 89cm wide) on a table-top, and made a circle with string 18cm in from the edge (to represent three 6cm layers of clay).  I placed a 12-inch pizza tray in the space, and decided that it would be cramped, but possible to cook under these constraints.  (I later ordered 9-inch pizza trays, to make some more space for the coals.)
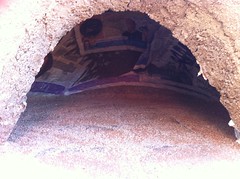
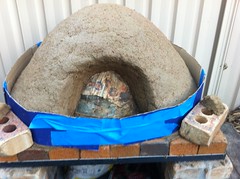
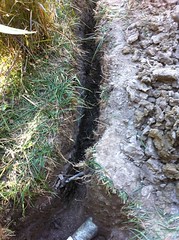
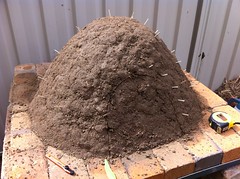
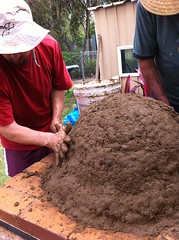
Measuring the Dome
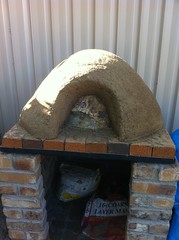
We transferred the interior dimensions to the foundation using chalk, and then built a dome-shaped mound out of slightly damp clay.  We put wet newspaper over it, and due to a breeze, had to keep wetting it to stop the newspaper from drying and blowing away.

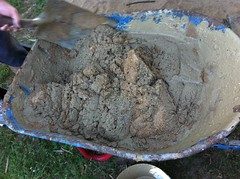
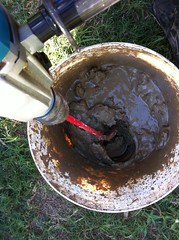
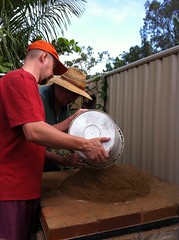
Then it was time to mix the clay with the sand.  I followed Simon Brookes's instructions pretty closely.  We put a thick but old tarp doubled over onto a concreted area.  We threw down a few shovels of sand, and we broke the clay into thumb-sized pieces.  We broke up clay and did the twist for ever.  Then we did it some more. This is apparently called 'puddling', and it is a nightmare of a job.  We may have had an overly dry mix, but that clay was determined to stay in blobs rather than mix with the sand.  Eventually we had a mix we liked.  It had taken about an hour of continuous dancing.

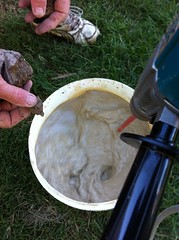
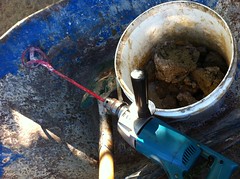
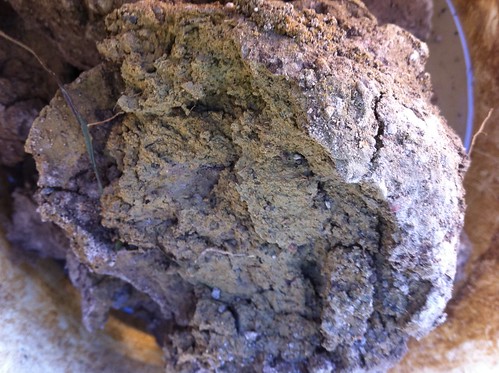
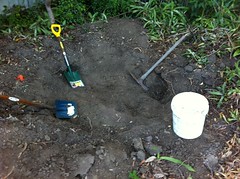
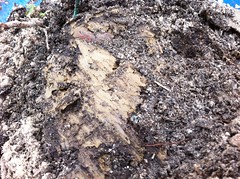
The Materials, Pre-Puddling
Then we started a second batch to ensure we would have enough for a single layer.  We actually ended up mixing more than we needed (by about a 20kg bag of chook feed); but I definitely wanted too much rather than not enough, and we really were guessing how much to mix.

I used the drop test on both batches, and both busted up a bit, with the second batch holding together better than the first.

If anyone is interested, I used 2-day old clay (I dug it up 2 days before, and just dropped it in a heap on the ground), and I estimate this layer involved the following quantities:
Puddling (Doing 'The Twist')

First batch:

2 x full 18-litre bucket of lumpy clay
4 x 3/4 full 18-litre bucket of sand

Second batch:
2 x full 18-litre bucket of lumpy clay
4 x 3/4 full 18-litre bucket of sand
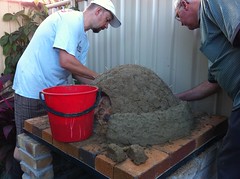
Adding the First Layer

We added water by guess (probably between 9 and 18 litres in all for each batch), mainly keeping the mixture damp rather than wet.  (Based on the theory that we can add more water but we cannot take it away.)  I think our approach resulted in a too sandy and too dry mix, especially based on what we worked with for the next two layers.
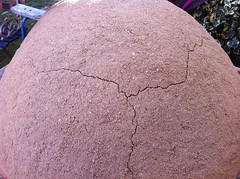
Nearly Finished the First Layer

We applied this layer by making small, very rough bricks and karate chopping the back edges going around in circles.  We had a fair bit of clay left, so we added some of this by slapping it on in handfuls.  This was not so much an entire layer as a thick coating on and between the rough bricks. In adding this rough layer it became apparent that a lot of our thumb sized lumps of clay were still thumb-sized lumps of clay.  (We had not mixed them in very well.)

...Geoff the Dancer (speciality: the twist)

Monday, April 11, 2011

3. Source Clay (First Site)

The First Site
Well, there was no holding me back now.  It was time to source the clay.

I the location of some excellent clay.  I had found it digging post holes for the chook shed.  After 12 years of chook poo, it seemed unlikely that this clay would be suitable for food preparation.  So I started digging about four metres from that earlier site.  This was not an optimal location, as it was in the middle of an existing garden bed, with established shrubs and groundcover.  I had also added a substantial amount of top-soil many years earlier to establish the garden bed.  Never mind.  Just a little bit of digging.

Clay from the First Site
We had had a wet summer, so I was pretty sure the ground would not be rock hard.  Sadly it did not appear that they water had penetrated far.  I removed the plants and top soil and failed irrigation lines.  Then I found the clay.  It was nice and solid, and much denser than the soil I'd been moving.  Sadly it seemed to be in veins rather than a single mass.  I followed these veins, lifting out one and a half barrow loads.

It was great to have this job done.  It had been much harder than I expected.

...Geoff the Digger

Saturday, April 9, 2011

2. Prepare Ground, Lay Foundation & Build Brick Pedestal

I wanted to dig for clay, but figured I should just have confidence that the Earth will provide, and get on with the pedestal.  So I dug a hole in the former sandpit/failed herb garden, levelled it out, and laid a single layer of bricks.  (This was instead of pouring a slab; a more time consuming and expensive job, given that the bricks were free.)
Measuring Up Before Laying the Foundation

I planned the pedestal based on brick dimensions - 4 across the back, and 4 1/2 for each side.  I was uncertain of the number of layers of bricks that I could do, but knew it was 7 or 8.  This would get the oven at or above waist height.

My father-in-law Bob and I got started on the pedestal on a Saturday morning.  When Bob arrived I was just preparing, and considering a slight change of plans.  I figured the U-shape would look even better if the ends curved in by half-a-brick.  This did not alter the number of bricks needed, and they would take up less space, so nothing else had to be changed.

The Completed Pedestal
I expected to make a day of it, but we were finished by smoko (about 2 1/2 hours work in all).  I spent some time later neatening up, but the mortar was mixed and the bricks laid in record time.

I had made a template (cut a piece of timber to length) to get the dimensions right to fit the shower base, and when we were finished building, it just popped in.  Given the weight of the shower base, I should probably have left it out for 24 hours, but instead I put sand in it, and laid the brick foundation for the oven.  Job done.

...Geoff the Brickie

Sunday, March 27, 2011

1. Research, Planning, Design & Initial Materials

The basic idea was to build a clay pizza oven, using local clay.  A few factors led to this plan:
  • I have been making bread for years, thanks to the advice of my friend Greg (& Simply No Knead).  As a result, my family and I started making pizzas with my own dough.  
  • I saw a brick pizza oven built by Mick in his backyard (and read a 'how to' guide he had). 
  • My friend Marty also had the spark of creativity.
  • My brother-in-law John built a beautiful clay oven.
  • At Christmas time, my friend Michael made delicious pizzas in a pre-fab oven in his backyard.
I am a researcher by inclination, so I researched pretty hard.  My main sources of ideas were Simon Brookes's Blog and PDF file, and the Forno Bravo community forum.  (However, any mistakes I have made are all my own.)

The Plan
I was pretty sure the clay could be found in a large garden bed at the back corner of my back yard.  I really wanted to get onto that part of it, but it was pretty obvious that a clay pizza oven would not be convenient if built at ground level.  It was also pretty obvious that a clay pizza oven would be heavy, really heavy.

So design started with the pedestal.  I thought about hebel, cement blocks, a solid pedestal, and steel framing.  Having bricked in the steel frame of my carport a few years ago, I was confident that I could build a U-shaped pedestal, leaving a space below to store timber.  I also wanted to put a timber shelf at the front of the pedestal, for convenience.  (This did not happen, but could be a future refinement.)

I continued to be uncertain of what to put on top of the bricks.  My father-in-law Bob and I went on a trip to the Dump Shop (a shop at our local rubbish tip that sells left objects).  Bob found an old cast iron shower base, with a hole in the centre for the drain.  He saw the potential for this to serve as the main base for the oven's foundation.  It could be filled with sand or cement and a layer of bricks for a foundation.  The lady at the Dump Shop let me have it for $5.
The Cast Iron Shower Base

I counted up the left over bricks my house was built from, and came up quite short.  At about this time one of my daughter's friends said that her Dad had some bricks.  Bob (The Other Bob) offered as many bricks as I needed.  I decided that his bricks could make a convenient foundation for the pedestal (instead of a slab), as well as the back wall of the pedestal, and the foundation for the oven.  I counted up the number needed, and collected them with a couple of spares for good measure.

I made my biggest purchase, sand and cement, at a local landscape supplies shop.  These set me back $170-odd.  I ordered a lot more sand than I needed, as I needed some to level my lawn in a couple of places.  I also unknowingly bought one bag of cement too many.  It is yet to be returned for a refund or credit.

I decided early on that simplicity would be good - to benefit the environment and my wallet, and to limit the potential for failure. One of the things I did to achieve this was to rule out a chimney/flue.

...Geoff the Researcher