Showing posts with label pizza. Show all posts

Saturday, May 12, 2012

13. Pizza Base Recipe

(NOTE:  This is a very effective recipe. However, it has been superseded by the simpler recipe posted here.)

Having undertaken extensive experimentation, testing and possibly some extra pounds around the stomach region, here is the recipe I am now using.  It is based on the Forno Bravo 'Authentic Vera Pizza Napoletana Dough Recipe', which is very good, but let's face it, a recipe can always be improved (or at least made more convenient and with locally available ingredients).

Ingredients

1kg box                 Lighthouse Bread & Pizza Plain Flour* 
650ml                   Water (65% hydration)
1/2 tablespoon (15gm)   Salt
1 tablespoon (6gm)      Active Dry Yeast
1 splash                Olive Oil
couple handfulls        Plain Flour

Equipment

Mixer with dough hook (optional)
Large Bowl (diameter about 30cm/12")
Baking Tray/Baking Sheet/Cookie Pan (large)
Baking Paper/Parchment
Rolling Pin
Dough Roller Docker (confused? click here)

Method
  1. Mix dry ingredients then add the water - you need all of it.
  2. Use a mixer with a dough hook - add water slowly, run slowly for 2 minutes, faster for 5 minutes, then slowly again for 2 minutes.
    (OR  Mix by hand for about 10 minutes - this is not for the faint hearted.)
    (Apparently you can also do this step in a bread machine.)
  3. Make a big ball of the dough, splash on some olive oil, rubbing it around to coat the whole ball.
  4. Put the ball in a bowl in a warm place until doubled (1 - 2 hours).
  5. Punch out air. Tear off 3/4 fist-sized chunks (for 8" pizzas) and form into balls.
    (You may need to experiment to find your preferred size.)
  6. To form a ball, choose a smooth part of the ball, and stretch it downwards by rubbing the palms downwards.  Pinch the remains together at the bottom.
  7. Put the balls pinched end down on oven paper well spaced on a large oven tray.
  8. Spray on olive oil.
  9. Store in the oven - rest for about an hour. (Too long and they run together, so if you are storing them longer, refrigerate.) 
  10. When you are ready to cook, roll them out on a bed of loose plain flour, and put on pizza tray or other surface and add toppings. Don't forget to use the dough roller docker to perforate the surface.
By the way, stuff all the 'this topping, that topping' stuff.  Just raid the fridge and remember, 'everything savoury tastes better on pizza'.

...Geoff the Chef

* Here is an interesting article about the protein/gluten content of Australian Lighthouse Bread & Pizza Plain Flour vs Italian Tipo 00 flour.  It is probably also relevant elsewhere.

Sunday, May 29, 2011

11. First Pizza & Great Satisfaction

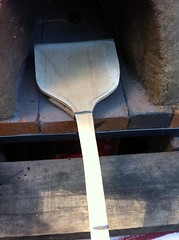
Homemade Pizza Peel
My wife noticed that I had gone quiet about the clay pizza oven; it having been my obsession for the last few months.  She decided that we would cook pizzas the next day, and we did.

(My enthusiasm had waned due to mixed performance with bread and large cracks.)

I started the day with another trip to the Dump Shop for materials.  This time to make a pizza peel (or shovel).  I found a perfect piece of laminated timber, cut it to shape, and added a eucalyptus stick for a rustic handle.  I used a hand sander to thin out the front edge into a blunt blade.  The peel performed well, but needs some more work to thin out the 'blade'.

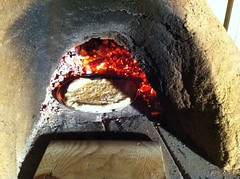
Patching the Crack
I planned to start cooking at 5pm.  I set a medium-sized fire at about 3pm, lit it at 3:30, added sticks and hardwood logs no bigger than my wrists, and worked up to a full base of coals about an inch thick by 5:30.  At that time I stopped adding timber, and waited half-an-hour for the contents to burn down to coals.

While the oven was heating I patched up the cracks using some clay and sand (probably 50:50) that I had left handy in a bucket.  At full heat the clay dried and blended in.  It is now as if there had never been a huge gaping crack.  (I know, I exaggerate.)

At 5:30 I made the pizza dough, using the recipe in an early edition of Simply No Knead Breadmaking by Carol and Ken Bates - a practical, classic Australian home bakers' 'how to'.  This dough is only slightly moist and very easy to handle.

The Very First Pizza - Garlic
Starting at about 6pm, I cooked 8- to 9-inch diameter pizzas using a number of methods, including:

  1. Garlic pizzas on 9-inch aluminium pizza trays on the floor.
  2. Pizzas with few toppings on 9-inch aluminium pizza trays.
  3. Pizzas with few toppings on 9-inch aluminium pizza trays on a bed of hot coals.
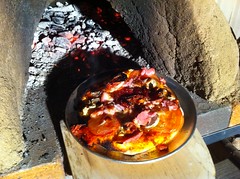
  4. Pizzas with lots of toppings on 9-inch aluminium pizza trays on hot coals.
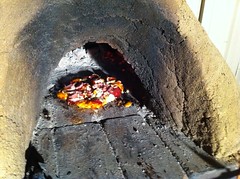
  5. Garlic pizza directly on the brick floor.
  6. Pizza with lots of toppings directly on the brick floor.

One With The Lot
All of the pizzas were great to eat.  The tops cooked well, and rapidly using all methods.  However, when the pizza trays were on the floor of the oven (at around 400 degrees celsius) the bases were pale and did not cook well relative to the speed at which the tops and edges cooked.  The bases cooked best on trays on a bed of coals, and also when cooked directly on the brick floor.  Cooking directly on the floor was fine with garlic only, but a messy job when toppings were added.  The winner is cooking on pizza trays on a bed of coals.  I am sure I will continue to experiment.

...Geoff the L-plater oven chef
Cooking on the Bricks